Powered By EmbedPress
Powered By EmbedPress
Powered By EmbedPress
HELPFUL IDEAS FOR PUTTING AWAY YOUR TREES FOR WINTER
These are a couple of things that may help you when you start to put your trees into winter quarters.
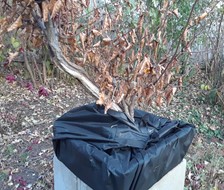
This is from our president, Craig. Craig says, “This is how I store my hardy trees for winter in my wife’s garden. I wrap a piece of lawn fabric (after making a cut halfway through) around each tree and secure it with a lawn staple. Then, when I bury the pot, I put some dirt on top. All the dirt comes off in the spring when I remove the lawn fabric, so I am not getting garden dirt into my bonsai soil. Lawn fabric does allow water to penetrate. I have always been concerned that the cold air would freeze the roots if the bonsai soil is exposed to the air because the soil is so porous. Not sure if the concern is valid but have used this system for 9 winters without problems.”
Note: Last winter I tried this method when I put my hardy trees away. In spring when we took them out of the ground, WOW, it worked like a charm. We dug them out, I took the landscape cloth off and all the dirt and mulch came off with it leaving my pots free of dirt and debris. Brilliant!
This little tidbit came from Rick. When getting his trees ready, he uses an old toothbrush to remove any unwanted moss, dirt, or hitchhikers. The stuff comes off easily and leaves the tree and pot clean and
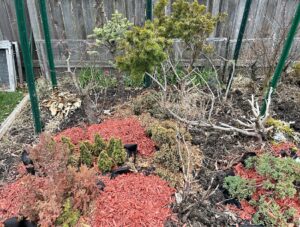
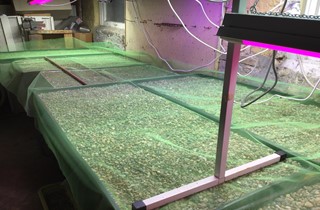
Then from me. Since I do not have a lot of discretionary money, I look for more economical (aka cheap) ways to do things; I found doing this just fit the bill. I have a lot of tropical trees, and the area has grown to 4′ x 16′. I have 8 trays 4′ x 2′ x 2” into which I put a 1-1/2” layer of pea gravel with Mosquito Bits tucked into the gravel. My trees sit on top of that, and water flows through the pots and into the gravel, keeping the humidity up.
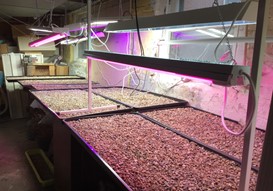
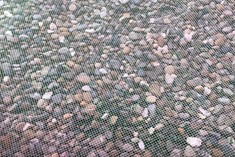
In the past, I have always spent many hours washing and cleaning all the leaves and debris out of the trays to ready them for fall. Then I found some netting (tulle) in an old sewing cabinet and tried using the sections over the gravel. In Spring, it was wonderful. Plants went outside, I rolled up the netting, shook out all the leaves, and voila gravel was clean.
This year I went to JoAnn Fabrics to get one solid piece to cover the whole area. Usually, it is $2.99 a yard, 54” wide. Boy, did I luck out? It was $1.47 a yard. So, I bought 5-1/2 yards, spent a whole $7 and some change, and the photos show it all. Next year it will be a breeze, and the cost will be less than a sawbuck. The pea gravel didn’t cost a lot, either. Several bags at Menards with their rebate were very affordable. The only thing was the initial cleaning of the gravel, but that was only once, years ago.
Also, for lighting, I have a lot of different lights collected on sale at Menards. Gro-lights, shop lights with grow bulbs and daylight bulbs in them, and LED lights. I eventually will change all to the LEDs but for now, well, the lumens are off the chart. Midway Airport uses my house as part of their landing strip. I have them all hung on chains with “S” hooks so I can adjust heights depending on the trees in that section, and wires will be tied up when trees come in. I also have 2 windows there but since it is all on the north side of my furnace room They don’t help much.
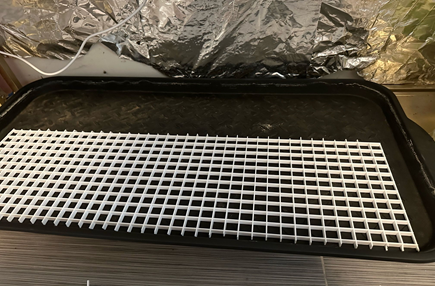
ALSO: An alternative to the pea gravel. This comes from Orlando and Katlin. Orlando uses 2′ x 4′ Suspended Egg Crate Light Ceiling Panels instead of pea gravel. They are easy to cut to the size you need and are a lot easier when doing your initial set-up. They are available from home improvement stores. I would still use the netting to contain the leaves and debris, though free of all debris.
Hope this helps, and if you have any ideas to share on how you put away your trees, feel free to submit them and share them with our membership. It all helps…
By: Charlotte Field