ROOT PRUNING AND REPOTTING
Purpose:
Root Pruning removes heavy, old, and excessively lengthy portions of the root system. The effect is to limit the tree’s growth by limiting the size and spread Of the root system and revitalizing the tree by creating an increased energy level by developing new and more numerous feeder roots. This results in the development a dense network of fine roots and branches. It also serves as a way to allow a bonsai to be replanted back into the same container, as it initially reduces the size of the root system and makes room for new soil in the pot.
Repotting allows for changing pot size or design to create a more harmonious combination of tree and pot. It also provides an opportunity to introduce new soil into the pot or to change the type and character of the soil where the tree is being grown.
Timing:
The ideal time to root, prune and repot is just as the roots begin to grow in the spring. If done earlier, such as during winter, the wounds created will remain open longer and vulnerable to the risk of further damage from frost Of fungal attack. The first sign of root growth can be seen in the buds’ swelling at the shoots’ ends. This applies to temperate materials only. Most tropical trees are best repotted and root pruned in mid-summer.
Procedure:
St” 1: Select the pot to be used in this procedure. If this is a different pot than the one the tree is currently in, you may prepare it now. Cover the drainage holes with mesh screening held in place with wire. Place one Of two longer wires into the pot by bringing their ends up through the drainage holes Of the smaller “wire holes.” When the tree is placed in the pot, these wires must be long enough to wrap over the root ball.
Step 2: Lift the tree out of the pot and inspect the roots. The roots should be sturdy and may show white tips. If the roots are brown and soft, this indicates decay. In this case, the soil should be drenched with a fungicide solution once the repotting is completed.
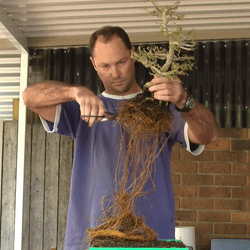
Step 3: Carefully comb out the roots using a chopstick, knitting needle, or pencil. Work from the center outwards using short, choppy strokes. You may also do this by directing a strong jet of water from a hose at the root mass.
Step 4: Trim the roots back by approximately one-third. Remove or shorten thick or lengthy roots. Use sharp, sturdy shears but do not use your best pair. It is possible to damage the blades if you hit any remaining grit from the soil. Use a mist bottle to wet the roots if they appear to dry.
Step 5: If reusing the same container, clean it of all soil and other deposits.
Prepare the pot as outlined in step 1. Cover the bottom of the container with a thin layer of soil mix. Create a small mound of soil where the tree will be placed.
Step 6: Nestle the tree into the mound of soil. The surface of the root mass should settle just below the pot’s rim. Pull the wires over the root mass and twist them together. Add more soil and work it into the root mass and between the roots. A chopstick can “push” soil into the open spaces. Dry soil works best as it will run into empty spaces more freely and not compact. Be sure to fill all air spaces. The tree should not rock. Tighten the wires if needed. Bits of rubber can be used to cushion the wire over large roots.
Step 7: Water thoroughly. Use a fine spray so as not to wash away the fresh soil. A solution containing vitamin Bl helps to reduce transplant shock. Repeat the watering again after a few minutes until the soil is saturated. Moss or another ground cover may be applied at this time.
Aftercare:
Place the tree in a location out of the wind and strong sun. Maintain an evenly moist soil condition. Do not prune, wire, or fertilize the tree for at least two weeks until new growth is established.
2001 PSBS Newsletter